Rack View
Contents: Types of Tracks · Referencing and Nesting · Modifying the Rack · Tracks Order Matters · Differences and Similarities

The Rack View is where you will likely spend most of your time creating videos, since this is where visuals and animations get combined to generate the music video. The specific controls and tools available to you in a rack will depend on the node graphs that have been defined in the Visualization and Animations nodes editors, so refer to that guide for more information on that topic.
Types of Tracks
Even though the available types of tracks are determined in the nodes editors, there is an important distinction to be made between two categories: Animation tracks and Visualization tracks. The easiest way to distinguish the two is from the little icon next to their names, but there are other distinctions described below.
Animation Tracks

- These are defined within the Animation editor.
- Their output is always an animation, which can be thought of as the equivalent of "envelopes" or "automations" in popular video editing, music production and animation programs.
- Their inputs cannot include Visuals or other Animations.
Animations are graphs that describe how a value changes over time. Per se, they don't carry any association with parameters that would result in visual changes in your video, but they can be associated with things that do—like the Opacity of a visual, or the Hue value of a Color Adjustment filter. More on that later.
If you are used to using existing video editing, animation, or music production software, jump to this section for a useful comparison: Differences and Similarities with Other Software.
Visualization Tracks

- These are defined in the Visualization editor. They differ from Animation tracks in two important ways:
- Their inputs can include Visuals AND Animations! These inputs are not available for Animation tracks.
- Their output is always a Visual.
- They can include an Animation as an optional output too, which is sometimes used to preview further calculations they might be doing on input animations. This can be viewed by selecting the "Combined Results" pill in the legend.

This Riser visualization track type has 3 animations plugged into various inputs. Because it internally multiplies those input animations by each other, it offers a Combined Results option to preview the resulting animation it will be using for the visual's opacity.
Referencing and Nesting Between Tracks
In order to "edit" your video and add motion to various effects, you will need to point various parameters of visualization tracks (e.g. "opacity") to animations that drive them. To this end, you can use these widgets on Visualization tracks:
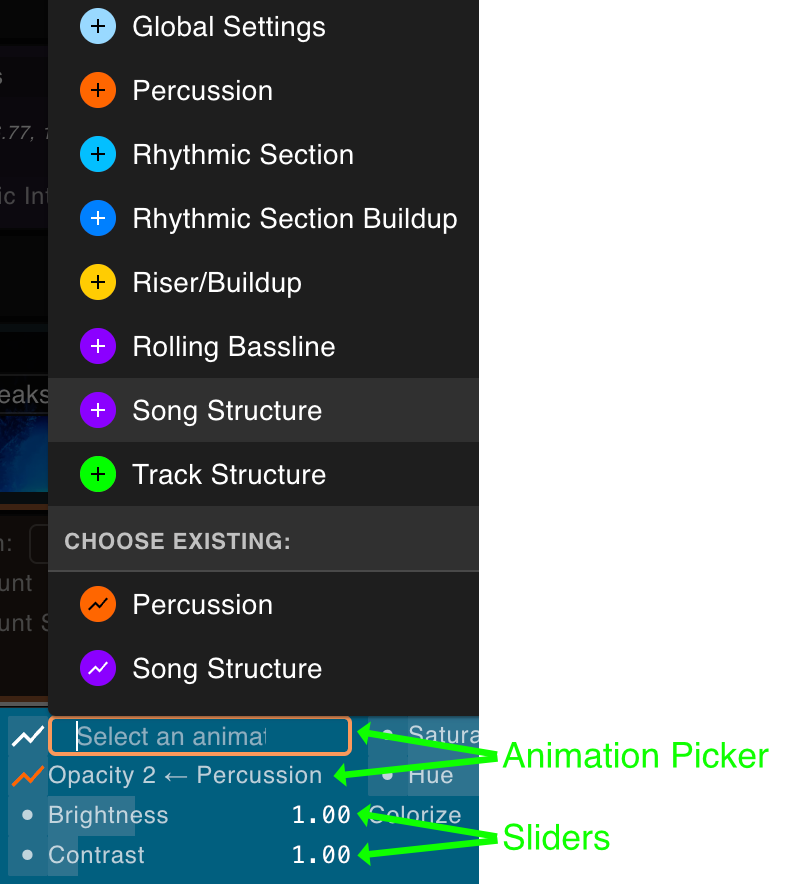
They will often appear as simple sliders where you can specify constant values. However, the toggle button on the left allows you to turn them into an "animation picker". There are two categories of choices within these pickers:
-
Choose an existing animation: these let you point the field to an existing animation track. This is especially helpful for reusing animation tracks from different fields. Clicking on the animation's name on the graph legend will simply scroll you to the referenced Animation track.
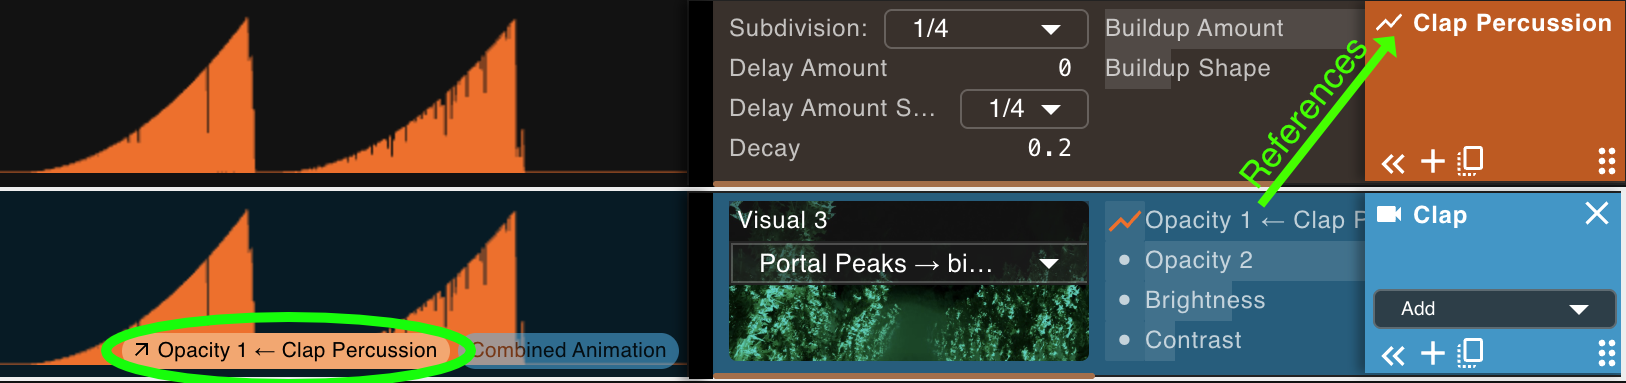
This "Clap" visualization track is leveraging the "Clap Percussion" animation track above it. The arrow next to the animation name in the graph legend denotes that this is a reference to another track.
-
Create a new, nested animation: these options create a new animation track that will only be utilized within the current Visualization track. You can edit the parameters of these "nested" Animation tracks too by selecting the edit button on the picker, or clicking on their name in the graph legend.
- If you change your mind later, when one of these animations is selected you can use the duplicate button to copy it into its own track.

This "Hat" visualization track instead has a "Percussion"-type animation nested within its opacity field. By selecting the animation's name in the graph legend, you can access its controls. You can back out of this state by clicking the "x" buttons that appear on the graph or in the box on the right.
Modifying the Rack
You'll often need to customize a rack to achieve your vision for any given song. Most of the relevant controls can be found in the name box to the left of each track. Visualization tracks have a couple extra elements so we'll look at one of those as an example:
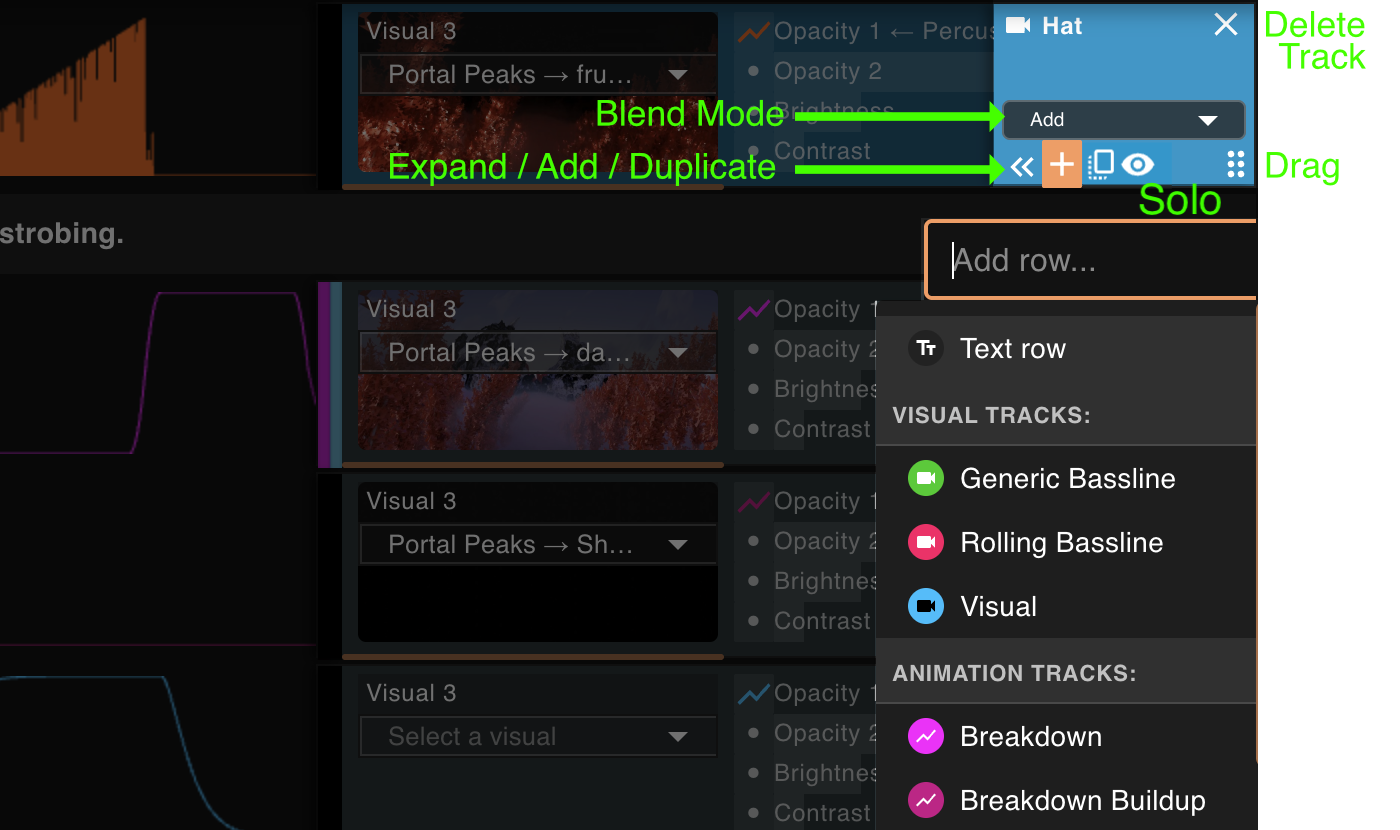
Here are some things worth calling out:
- The Expand button will cause the controls to expand to cover the entire available width, covering the graph. Press
Tabto expand all rows at the same time. - The Duplicate button will allow you to duplicate a nested Animation track when that track is currently selected (either through the graph legend or through the edit button in the animation picker).
- You can rename any track by clicking on its name.
- The Solo (eye) toggle on visualization tracks limits the preview to just that track.
Ctrl/Cmd-click to solo multiple tracks at once, or pressSto toggle solo for the selected track(s). Solo only affects the preview — never the final render — and is not saved with the song. - Hovering the small track-type label at the top of a track reveals a circular nodes icon: click it to jump straight to the corresponding output node in the nodes editors. If you are editing a nested animation, the same icon appears when hovering its name at the bottom of the box, jumping to that animation's output node.
Pro tip: One way to speed up your workflow is to go through all tracks to adjust the animations as needed, then press
Tabto expand all controls and go through all tracks again to put together and customize the visuals.
Tracks Order Matters
The fact that the order of tracks actually matters might not sound like a big surprise: just like in other video or image editors, visualization tracks act as layers, as they are blended one on top of each other. The first track in the rack will be on top of everything else, and the last one will act as background.
However, there is another aspect influenced by their order: tracks that have dependencies on other tracks will be computed using the latest value of those tracks, reading the rack from top to bottom. This tends to be most evident with some types of Animation tracks (where most of the complex behaviors are implemented), but visualization tracks can implement similar behavior too.
Whether tracks depend on each other or not is determined in the nodes tree, so there are infinitely many ways in which tracks can affect each other. A more in-depth look at this appears in the nodes editors guide. An example follows from the Layered Visuals template currently included in Vizloom, which should clarify things enough.
Example
In this example, I eliminated all tracks from the Layered Visuals template and only left in:
- Song Structure: an Animation track of type Song Structure
- Kick: a Visualization track that itself contains
- a nested Percussion-type animation track in its Opacity 1 input

From the graph, we can see that, apparently, Percussion animations depend on Song Structure animations because they use it to modulate their own amplitude. Nested animations will be affected too, as is the case in this first example. In the following example, we add some Percussion animations that are NOT nested.
Any percussion track we insert AFTER the Song Structure will follow that Song Structure animation. Tracks inserted before will not, and additional Song Structure tracks will override the first:
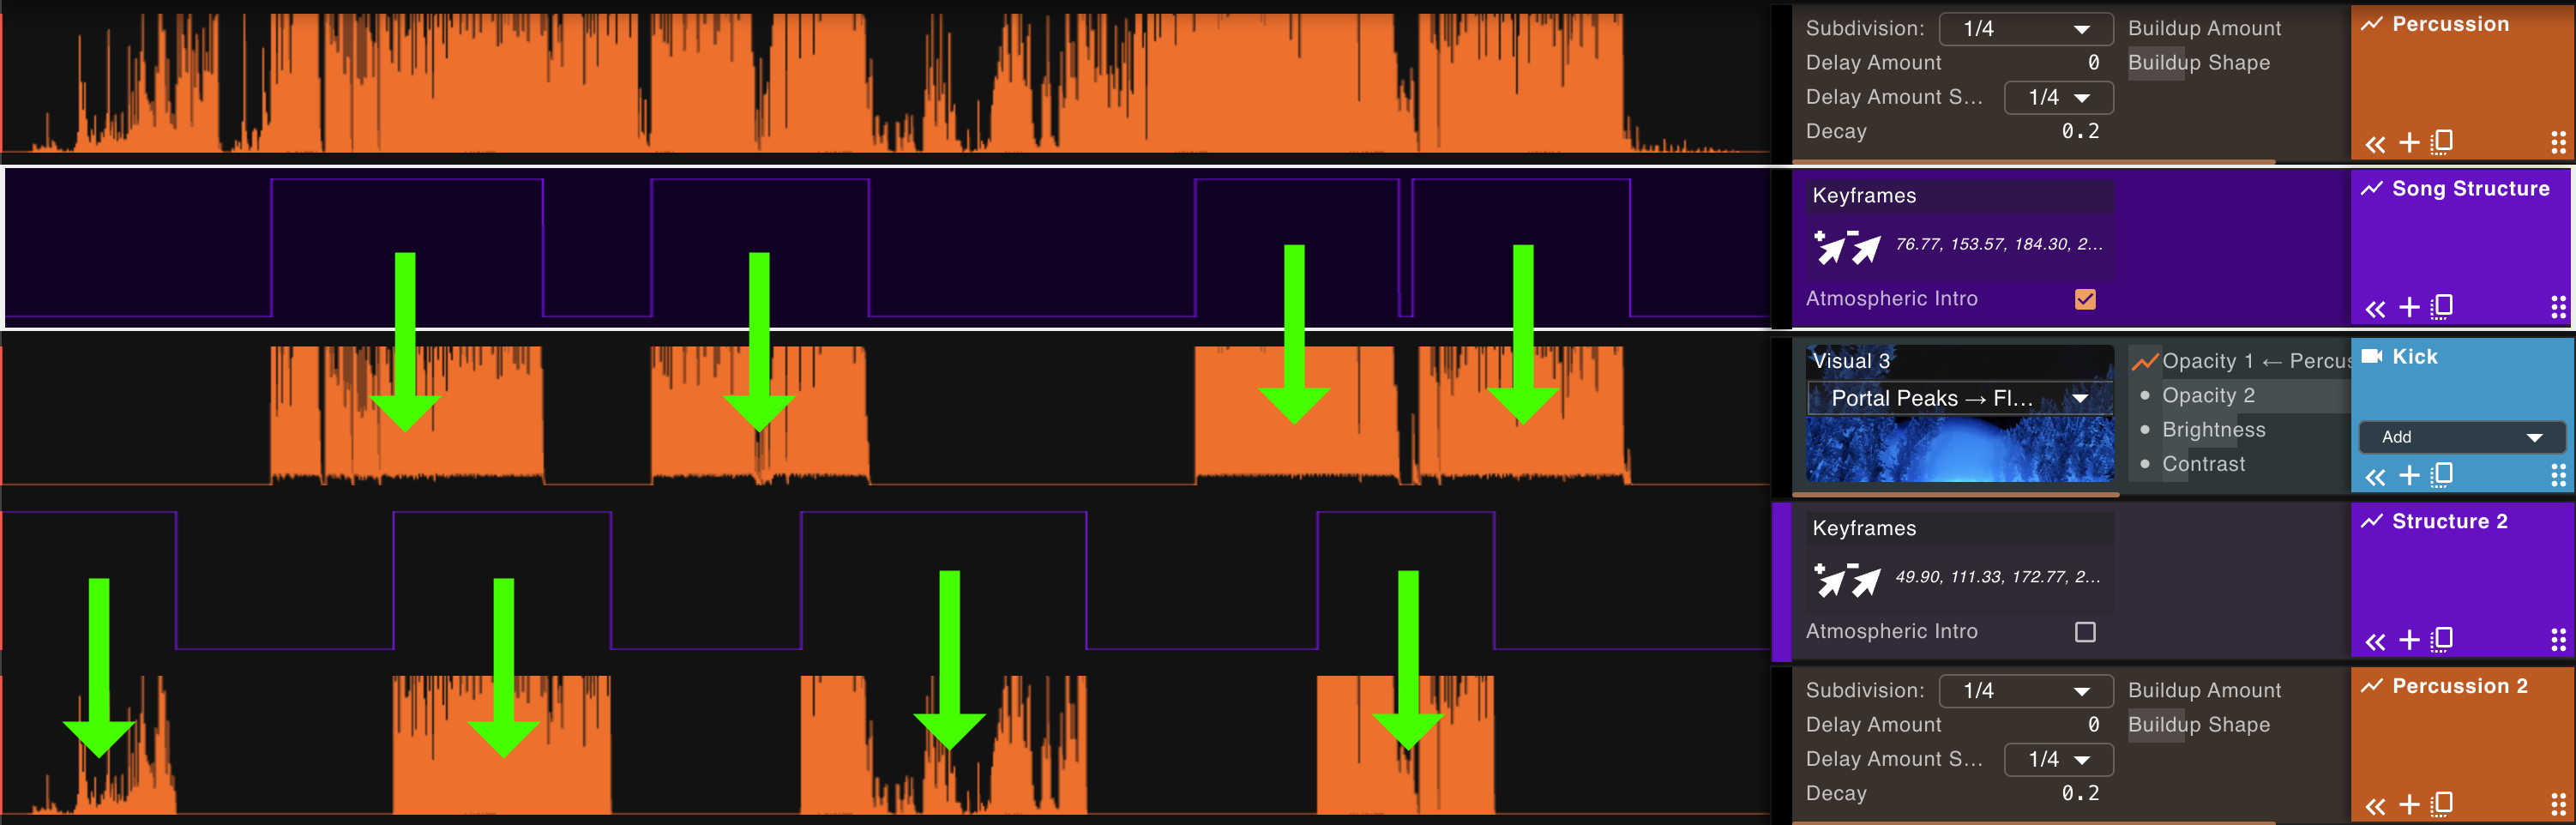
There is no limit to the interplay between tracks, allowing you to build very sophisticated workflows: think of track types as "smart brushes" that know about each other, and can be programmed visually in the nodes editors. The Kick visual is built to follow the Song Structure precisely. A "Track Structure" animation is usually built to depend on the Song Structure and expose controls to further refine it for individual tracks, for example to have a "Clap" visual appear a little later than the drop, instead of right after it as per the Song Structure:

In a more sophisticated template, Percussion tracks depend on a Track Structure track (that can be used optionally), which in turn depends on Song Structure tracks. The keyframes picker in this screenshot is left active to highlight the values introduced by the Track Structure animation.
Nested tracks are affected by other tracks, and they also affect each other in the order in which they are specified within the track's inputs. However, they won't affect following tracks in the Rack. Think of these cascading effects between tracks as hierarchical:
- Song Structure
- Clap (visualization)
- Track Structure: further refine the song's structure to point where the Clap specifically is going to play
- Percussion: animation for the Clap's opacity, affected by both Song Structure and Tack Structure
- Kick (visualization)
- Percussion: animation for the Kick's opacity, only affected by the song's structure. The kick plays from when there is a drop until when there is a breakdown.

We nested the Track Structure animation within the Clap visualization track. The Clap's percussion is now affected by the clap's track structure, which is affected by the Song Structure. The Kick's Percussion however is NOT affected by the Clap's Track Structure, but only by the Song Structure.
Differences and Similarities with Other Software
The Rack view is meant to collect the functionality you will most likely want to access when visualizing any given song into one quick-use view. For this reason, it draws parallels with typical video or image manipulation software, including in the way an animation can be easily assigned to a parameter.
Animations in Vizloom, however, aren't limited to the keyframing mechanisms usually seen in such programs (even though there are ways to build out that specific behavior in Vizloom too). They are rather more similar to "signal processing" inspired workflows akin to software commonly used by artists to build real-time, interactive art installations.
At the same time, one more key difference worth stressing is that Vizloom animations are not aimed at real-time computation, and can therefore rely on 2-pass algorithms (in other words: values at any point in the output animation can depend on future values of the input animations as well as past ones). This comes in very handy for things like, for example, fading out a scene in preparation for the drop of an EDM song.