Tracks and Nodes
Contents: Overview · Building Animation Tracks · Building Visualization Tracks · Interdependent Tracks · Cascading Effects · Inline Animations
This guide walks through how nodes in the editors and tracks in the Rack View work together. If you haven't already, check out the Quick Start Guide for a high-level overview of a typical Vizloom workflow with pre-built templates. Here we go a level deeper and build a template from scratch.
Overview
Vizloom's node editors give you full creative freedom to define custom track types, while the Rack View lets you use those types quickly and repeatedly across songs. You define types of tracks in the node editors, then create and customize individual tracks of those types in the Rack View.
For a deeper look at the design philosophy behind this approach — why nodes are powerful for multimedia art and where a complementary "fast lane" is needed — see the blog post: Nodes as an Artistic Tool.
Building Animation Tracks
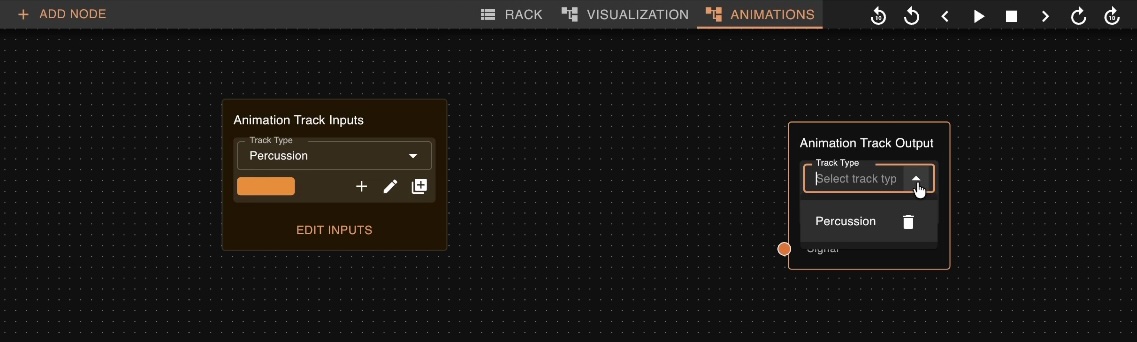
Animation tracks are defined in the Animations editor. There are two special node types that tie a node graph to the Rack View: Input nodes and Output nodes. Both carry a track type widget at the top that lets you select an existing track type or create a new one.
Creating a Track Type
- Open the Animations editor.
- Add an Output node (or an Input node — either one can create a new track type).
- In the track-type widget, choose Create New and give it a name (e.g. "Percussion").
Once a track type exists, every Input and Output node you point at it will share the same attributes (name, color). Back in the Rack View, you'll see a new option in the Add Track menu matching the type you just created.
Note: A newly created animation track type won't do anything in the Rack View until the Output node actually receives a signal.
Wiring Up the Output
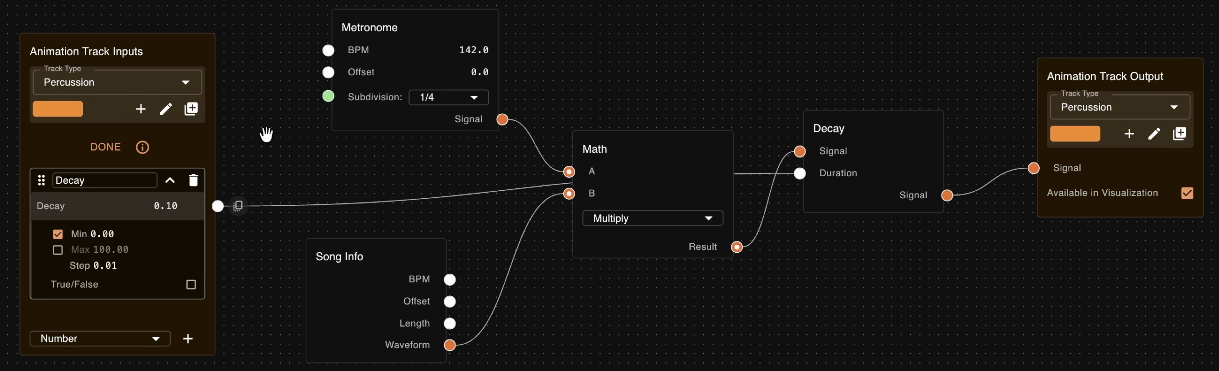
With a Percussion track type as an example, here's one simple way to give it life:
- Metronome node — produces one pulse per beat (or per subdivision you choose), pre-configured with the song's BPM.
- Decay node — softens each pulse with a gradual falloff instead of an instantaneous spike, giving the animation a more natural, percussion-like feel.
- Song Info node — outputs the song's waveform so you can modulate the animation according to actual audio activity.
- Math node — multiplies the decayed pulses by the waveform. The result reacts to the music instead of pulsing like a plain metronome.
Connect the final output of this chain to the Output node. The Rack View will now show a meaningful animation graph that follows the song.
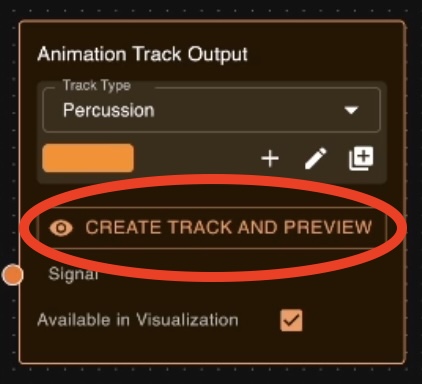
Note: In order to preview the graphs produced by any selected node directly in the nodes editor, make sure there is at least one track in the rack view of a type that would use that node. The previews in the graph editor will be based on the values of whichever track of that type is the last one in the rack view. You can click the "Create Track and Preview" button to create the first track directly from the output node.
Exposing Controls with Input Nodes
So far, the animation works but there's no way to tweak it from the Rack View. That's where Input nodes come in. An Input node exposes a parameter as a control (slider, picker, etc.) on every track of that type.
For example, adding a Number input and connecting it to the Decay node's duration parameter lets you adjust the decay length per track without opening the node editor. You can copy the target parameter's constraints (e.g. "no less than zero") with a single click, then rename the input to something readable like "Decay".
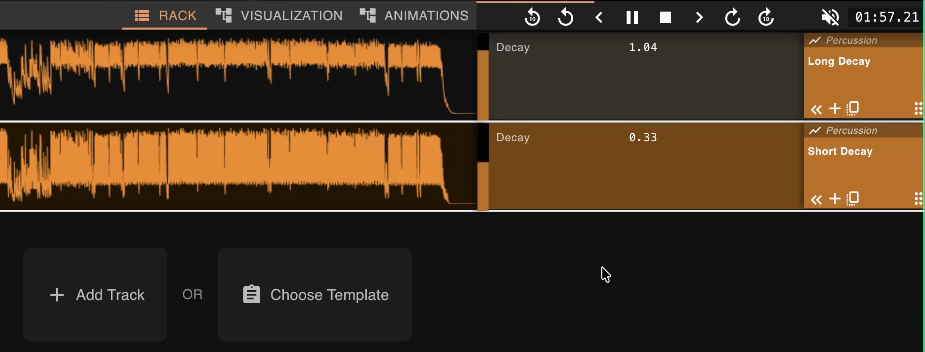
Once saved, every Percussion track in the Rack View will feature a Decay slider — and you can create as many Percussion tracks as you want, each with its own settings.
Building Visualization Tracks
Visualization tracks are defined in the Visualization editor. The overall workflow is similar: add Input and Output nodes, point them at a new track type, and wire up nodes in between.
Extra Input Types
The Visualization editor offers two input types that aren't available in the Animations editor:
- Visual Reference — lets you pick a visual from your library directly on the Rack View.
- Animation — similar to the Number input (it appears as a slider for constant values), but also allows you to select or create an Animation to drive the parameter. This is how you connect animations to visual effects like opacity or color.
A Simple Visual Track
Here's a minimal example of a "Visual" track type:
- Create Input and Output nodes pointed at a new track type (e.g. "Visual", with an electric-blue color).
- Add a Visual Reference input and an Animation input.
- Add a Merge Visuals node — this has an opacity parameter you can drive with the Animation input.
- Connect the Visual Reference into the Merge Visuals node, the Animation input to its opacity, and the Merge Visuals output to the track's Output node.
Now you can control a visual's opacity directly from the Rack View, and even tie it to an Animation track (like the Percussion one built above).
Adding More Effects
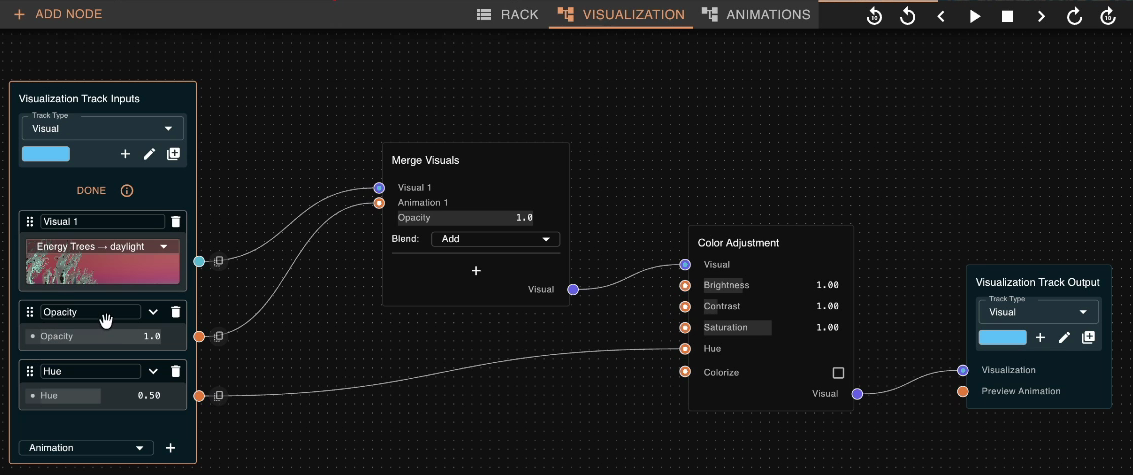
There's really no limit to what you can do inside the node graph. For instance, you might add a Color Adjustment node between the visual source and the output to let users shift the hue. Expose the hue parameter as another Animation input on the Input node, copy the parameter constraints, and save.
Back in the Rack View, every track of this type will now have both an Opacity control and a Hue control — each of which can be driven by an animation or set to a constant value.
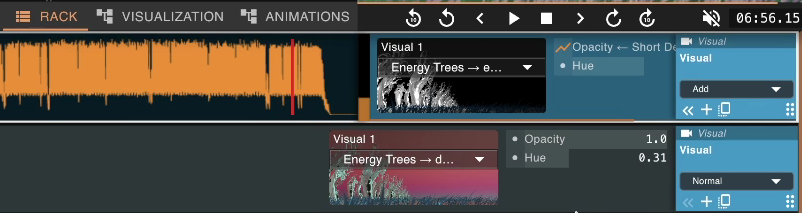
Note: The visualization preview is based on what's in the Rack view, even while you are in the visualizations node editor. You can however tweak the nodes tree and see the effect its changes have on the current tracks reflected in real time.
From the Rack View, hover any track to see little circular nodes icons appear in their header on the left. Click those to jump straight to the output node that defines that track's type.
Default Values and Previews
Before leaving the node editor, it's helpful to set sensible default values for inputs. These are the starting values assigned to any new track you create in the Rack View. Defaults don't have to be static, either: by wiring other nodes into a socket on the Inputs node, that input's default becomes computed — evaluated from the connected graph, so new tracks can start out with values derived from the song itself.
The automated scene detection, for example, feeds into the Song Structure's default so you can have a sensible starting point to work with, tailored to each specific song.
If you plug a nodes tree in the inputs of an animation / visualization track input, all other instances of animation / visualization track input nodes for the same track type will read from that input (their sockets will be disabled).
Interdependent Tracks
One of the most powerful features of this system is that tracks can interact with each other. This is what turns the Rack View into a huge time-saver: you define relationships between track types once in the nodes, and every song benefits automatically.
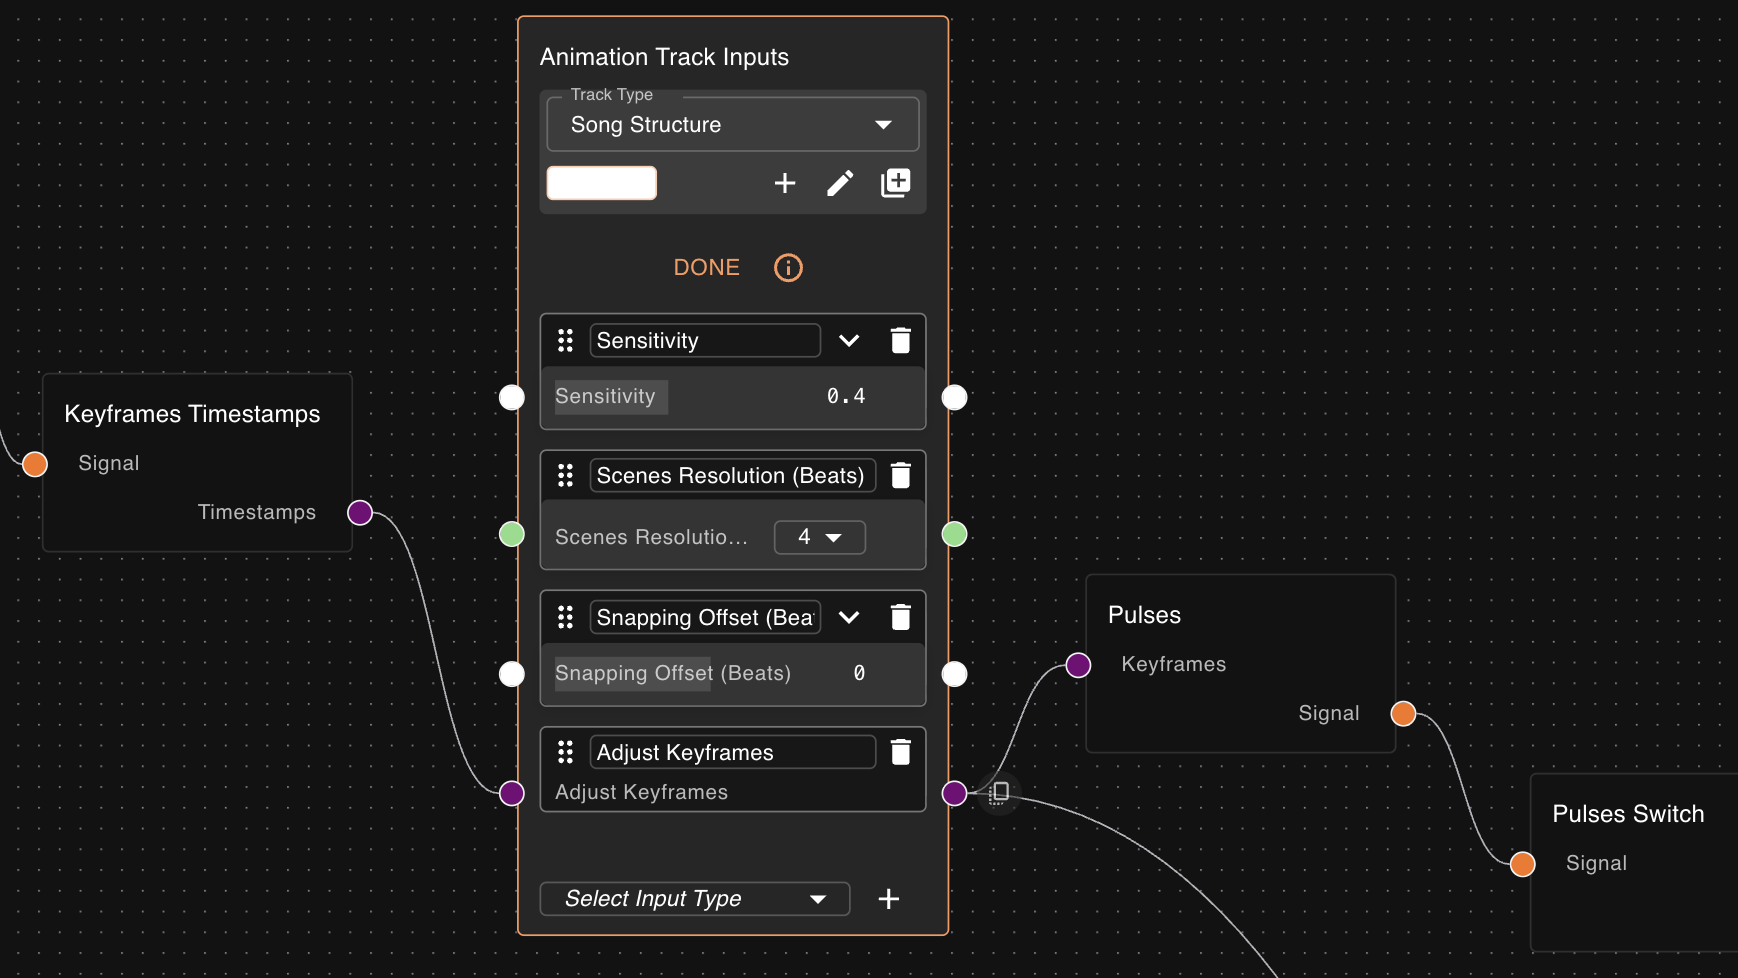
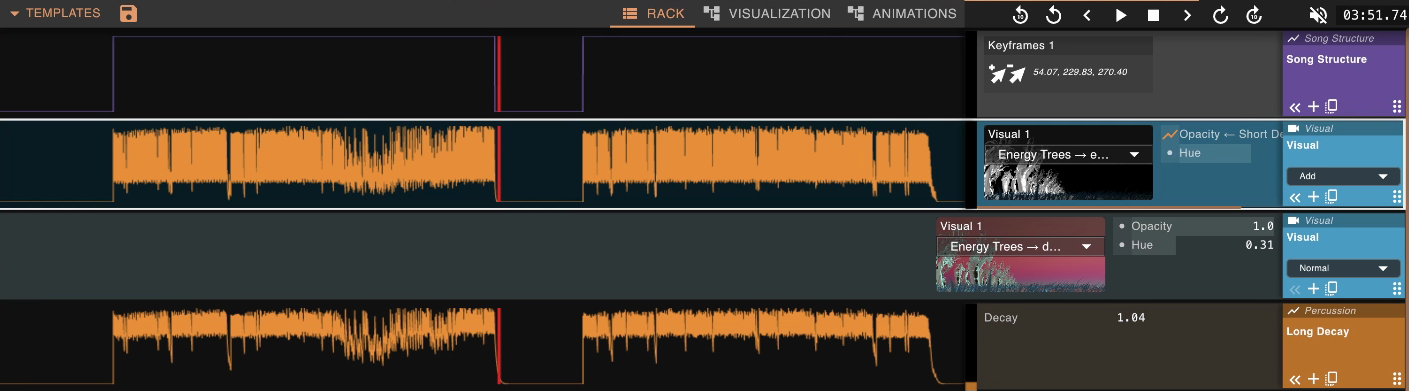
Song Structure Example
A common pattern in Vizloom templates is a Song Structure animation track that influences the amplitude of all Percussion animations. This way, during an atmospheric intro or a breakdown, the percussion-driven visuals gracefully fade away and bring a more relaxed pace to the visual composition.
Here's how it's built:
- In the Animations editor, create a new track type called "Song Structure".
- Add a Key Frames input — key frames are just a list of timestamps you'll click onto the waveform in the Rack View, marking where intros and breakdowns begin and end.
- Add a Pulses node — this converts the list of timestamps into discrete pulses.
- Add a Pulses Switch node — this works like a light switch. Each incoming pulse toggles its state between on and off, producing a square wave that represents the structure of the song: up means the groove is active, down means a breakdown or ambient section.
- Feed the result into the Output node.
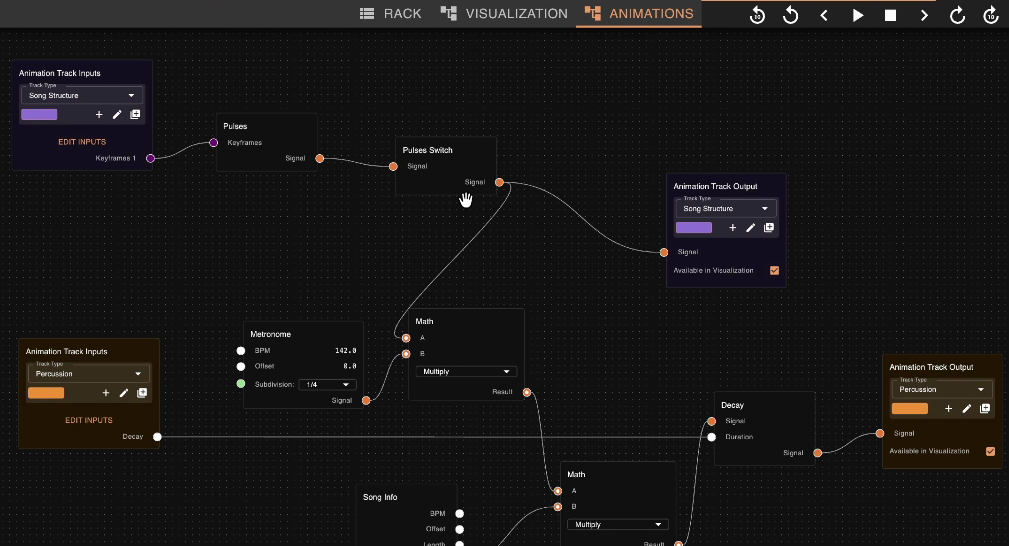
Because the Percussion track type's node graph already multiplies by this Song Structure signal (via a Math node), every Percussion track in the Rack will automatically respond when you mark out breakdowns in the Song Structure track.
Cascading Effects
You can create multiple tracks of the same type in the Rack View. A natural question is: if you have two Song Structure tracks, which one do the Percussion tracks follow?
The answer is simple: the last one wins. Tracks are read from top to bottom, and each track of a given type overrides the influence of the one above it. So:
- If a Song Structure track is above a Percussion track, that Percussion track follows it.
- If a second Song Structure track sits between the first and the Percussion track, the Percussion track follows the second one.
- Moving a Percussion track above all Song Structure tracks means it won't be affected by any of them.
This doesn't mean you can only have one Song Structure track per template — it means that order matters. You read the rack like a text, where each track influences the ones below it in the order in which they appear.
Pro tip: Use this behavior deliberately. For example, you might have a general Song Structure track at the top of the rack, then add an extra one further down to override the structure for a specific section of the visual composition.
For a more detailed look at how ordering affects tracks, see the Tracks Order Matters section of the Rack View guide.
Inline Animations
You don't need a dedicated Animation track in the Rack for every animation you use. Within the Visualization editor, Animation inputs can also create new animations directly inside a Visualization track.
For example, when selecting an animation for an opacity field, you'll see a "Create New" section in the picker menu. Choosing a Percussion animation here will nest it within the Visualization track itself. You can then dive one level deeper to customize that specific animation however you like — and it will still follow the Song Structure in the same way a standalone Percussion track would.
This is especially handy when an animation is only relevant to a single visual and you don't want it cluttering the Rack as a separate track. If you later change your mind, you can always "eject" a nested animation into its own track using the Duplicate button.
For more details on nested animations, see Referencing and Nesting Between Tracks in the Rack View guide.
What's Next?
Now that you understand how nodes and the Rack View work together, here are some paths forward:
- Explore the Nodes Guide to learn about every node type available in the editors.
- Experiment with Templates — modify existing ones or build your own from scratch.
- Check out the Rack View guide for a deeper look at track controls, blending modes, and the layer system.